Best Kayak Anchor Trolley Setup
If you've ever tried to fish from a kayak in Kansas, you know the struggle is real. One minute you're perfectly positioned over a promising brush pile or drift line, and the next, a gust of wind or a subtle current has dragged you away, forcing you to paddle furiously back to your spot, often spooking the very fish you were targeting. It’s incredibly frustrating and can turn a peaceful day on the water into a constant battle against the elements. This guide is all about one game-changing piece of gear that tackles this exact problem head-on: the kayak anchor trolley. We're going to dive deep into what it is, why every Kansas kayak angler needs one, how to set it up, and how to use it to maximize your fishing success, no matter what Mother Nature throws at you.
Understanding the Kayak Anchor Trolley System
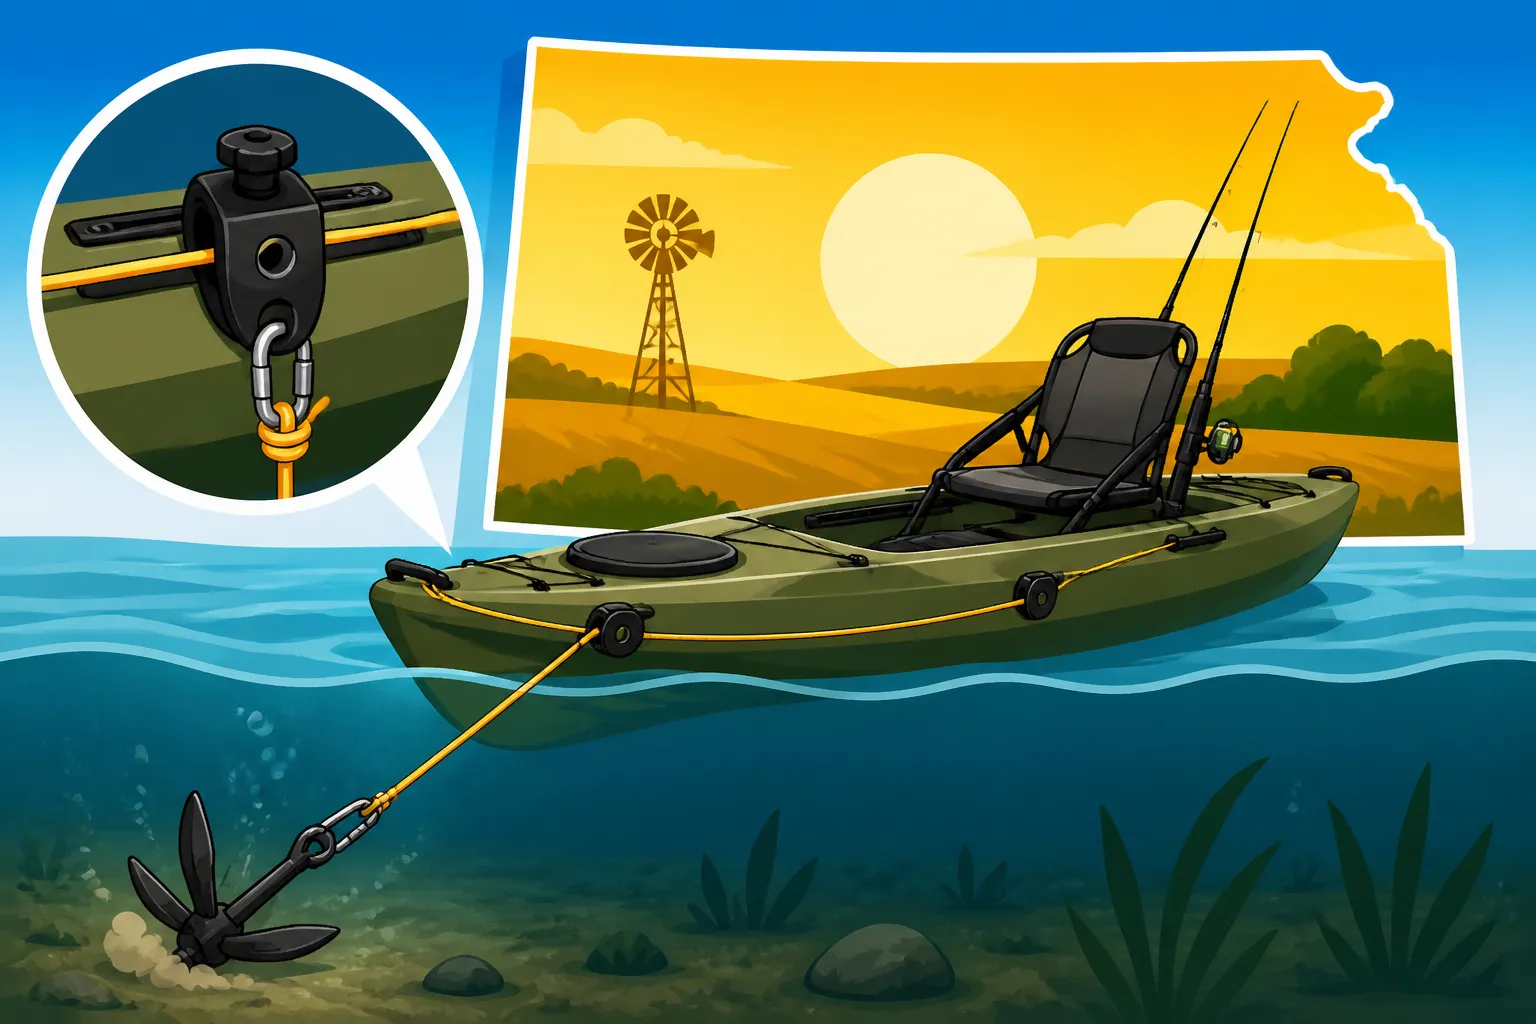
Imagine being able to precisely control where your anchor is deployed along the entire length of your kayak, all without ever leaving your seat. That's the magic of a kayak anchor trolley. It’s essentially a simple pulley system that runs from the bow to the stern of your kayak, allowing you to quickly and easily shift your anchor point. This isn't just a convenience; it's a fundamental tool for safety and effective fishing, especially when dealing with the diverse and often challenging conditions found in Kansas waterways, from the vast expanses of Milford Lake Fishing Guide to the winding currents of the Kansas River Fishing Guide.
Why a Kayak Anchor Trolley is Essential for Kansas Anglers
Kansas weather, as we all know, can be incredibly unpredictable. One moment it's glassy calm, the next you're fighting a stiff breeze that wants to spin your kayak around like a top. Without an anchor trolley, you're pretty much stuck with two options: either anchor directly off the bow or the stern. If you anchor off the bow and the wind picks up, your kayak can act like a sail, making it difficult to cast or even stay pointed in the right direction. Conversely, anchoring off the stern can put your paddle or fishing line in a perilous position, especially if you hook into a powerful fish. The anchor trolley solves this by giving you dynamic control.
Think about fishing for walleye on a windy day at a large reservoir. You've found a promising drop-off, but the wind keeps pushing your bow away from the sweet spot. With an anchor trolley, you can drop your anchor and then slide the anchor line's attachment point to the stern, allowing your kayak to pivot and face directly into the wind, keeping your bow stable and your casting lane clear. Or, if you're working a river bank for catfish, you might want your anchor at the bow to hold steady against the current, then shift it to the stern if you need to swing your boat around for a different cast without pulling up the anchor. This precision control translates directly to more time fishing and less time fighting your boat, which is why it's a crucial piece of your Kansas Kayak Fishing Gear Guide.
Safety Benefits of a Properly Rigged Trolley
Beyond just improving your fishing efficiency, an anchor trolley significantly enhances safety. Imagine anchoring directly off the side of your kayak in a strong current or stiff wind. This creates a huge amount of surface area for the wind or water to push against, potentially capsizing your kayak or pulling you sideways into dangerous obstacles. It’s a common mistake that can have serious consequences.
With an anchor trolley, you can always position your anchor at either the bow or the stern, ensuring your kayak is oriented in the most stable way possible relative to the current or wind. This dramatically reduces the risk of being swamped or flipped. In an emergency, like if your anchor snags on the bottom or you hook a fish that pulls you into danger, most anchor trolleys are designed with a quick-release mechanism. This allows you to rapidly detach your anchor line from the trolley system, freeing your kayak to drift safely away from the hazard. This peace of mind is invaluable, particularly when navigating unfamiliar waters or during solo trips.
Components of a Kayak Anchor Trolley System
A kayak anchor trolley system might look a little daunting at first glance, but it's actually quite simple when you break it down into its core components. Understanding each piece and its role is key to both proper installation and effective use on the water. Whether you're piecing together your own DIY system or buying a pre-made kit, knowing what you're looking at will make all the difference. Many anglers find what they need at outdoor retailers like Bass Pro Shops or through convenient online marketplaces like Amazon.
Essential Hardware and Rigging Materials
At its heart, an anchor trolley is a closed loop of rope or line that runs along one side of your kayak. The key components include:
- Pad Eyes (or J-Hooks): These are small loops that screw or rivet into your kayak's hull. They serve as the attachment points for the trolley line. Typically, you'll install two pad eyes near the bow and two near the stern, creating the channel for your trolley line. You want these to be robust and securely fastened, as they'll bear the load of your anchor.
- Pulleys: Two pulleys are used to reduce friction and allow the anchor line to slide smoothly along the trolley line. One pulley attaches to each end of the trolley line. These need to be durable and resistant to corrosion from freshwater or saltwater exposure.
- Trolley Ring: This is the central piece that your actual anchor rope passes through. It moves freely along the trolley line, allowing you to change your anchor's position. It should be large enough for your anchor rope to easily pass through but small enough not to snag excessively.
- Cleat (or Zigzag Cleat): This is essential for securing the trolley line once you've adjusted the anchor point. A good cleat will hold the line firmly in place without slipping, even under load.
- Trolley Line: This is the rope that forms the closed loop of the trolley system. It needs to be strong, abrasion-resistant, and ideally, floatable, especially if it's external to the kayak. Many anglers opt for tough nylon or polypropylene rope.
When selecting these components, especially for use in Kansas where you might encounter varying conditions, prioritize quality. Stainless steel hardware is often preferred for its corrosion resistance and strength, though robust plastic alternatives can also work for lighter anchor setups. A good Best Line Weight for Kansas Walleye article can also offer insight into rope strength if you're considering DIY options.
Anchor Selection for Kayak Fishing in Kansas
The best anchor for your kayak in Kansas really depends on where you're fishing and what conditions you expect. There's no one-size-fits-all solution, but a few types stand out for kayak anglers:
- Grapnel Anchor: This is perhaps the most common kayak anchor. Its four prongs fold up for compact storage and fan out to grab onto rocks, roots, or other underwater structure. It's excellent for holding position in rivers or on rocky lake bottoms. Just be mindful of snags; some grapnel anchors are designed to bend open under extreme pressure to free themselves.
- River Anchor (or Drag Anchor): These typically have a more flattened, spade-like design or chain links, designed to dig into soft bottoms and resist current without being overly heavy. They are ideal for the mud and silt bottoms often found in Kansas rivers or calmer reservoir coves.
- Mushrooms Anchor: Best for soft, muddy bottoms, these anchors get their name from their shape, which creates suction to hold your kayak in place. They’re less effective in strong currents or on hard, rocky bottoms but can be very useful in quiet ponds or backwaters.
The weight of your anchor is also a critical factor. For most kayak fishing in Kansas, a 1.5 to 3-pound anchor is sufficient. If you’re regularly battling strong winds on a large reservoir like Cheney Reservoir Fishing Guide or significant current in a river, you might consider a slightly heavier anchor or a combination of anchor types. Remember, the trolley system makes deploying and retrieving even a slightly heavier anchor much easier. Don't forget to have adequate anchor rope—at least 50 feet is a good starting point, allowing for a good scope (the ratio of rope length to water depth) for better holding power.
Step-by-Step Installation Guide for Your Anchor Trolley
Installing an anchor trolley might seem intimidating, especially if you're drilling into your precious kayak. But trust me, with a little patience and the right tools, it's a straightforward process that any DIY-minded angler can tackle. Most pre-packaged kits, often available from retailers like Bass Pro Shops or through Amazon, come with detailed instructions, but understanding the general steps will help you customize it to your specific kayak and fishing needs.
Preparing Your Kayak and Gathering Tools
Before you start drilling, take a moment to plan out your installation. Decide which side of your kayak you want the trolley on. Most right-handed anglers prefer it on the left (port) side for easier access to the cleat and anchor while keeping their dominant hand free for fishing. Left-handed anglers might prefer the right (starboard) side. Consider where your paddle rests, your Best Rod Holders for Kansas Boats, and any other accessories to ensure the trolley doesn't interfere.
Here’s a basic list of tools you’ll likely need:
- Drill: A cordless drill is ideal for portability.
- Drill Bits: You'll need bits appropriate for drilling through plastic (the hull of your kayak) and sized correctly for your pad eye screws or rivets. Always start with a smaller pilot hole if unsure.
- Phillips Head Screwdriver (or Rivet Gun): Depending on how your pad eyes attach.
- Marine-Grade Silicone Sealant or Goop: Absolutely crucial for waterproofing any holes you drill. You don't want water leaking into your hull!
- Measuring Tape and Marker: For precise placement.
- Scissors or Knife: For cutting your trolley line.
- Lighter: For melting the ends of synthetic rope to prevent fraying.
Take your time during this preparation phase. A little planning here will save you headaches later. If you're unsure about drilling, consider temporary, non-permanent mounting options or consult your kayak manufacturer's recommendations.
Mounting the Hardware and Threading the Line
With your tools ready, it's time to get started.
- Mark Pad Eye Locations: Position your kayak on a flat, stable surface. Take your pad eyes and place them roughly 6-12 inches from the bow and stern, along the side of the kayak where you want the trolley. Make sure they are aligned horizontally. Use your marker to mark the drill points. Double-check your measurements to ensure symmetry and proper clearance.
- Drill Pilot Holes: Carefully drill small pilot holes at your marked spots. Once pilot holes are made, you can expand them to the size required for your screws or rivets. Go slowly and apply steady pressure.
- Install Pad Eyes: Apply a generous amount of marine-grade sealant around and into each hole before inserting the screws or rivets. This is vital for preventing leaks. Tighten securely, but don't overtighten, as you could strip the plastic or crack the hull.
- Mount Pulleys: Attach one pulley to the forward-most pad eye and the other to the aft-most pad eye. Some kits may have dedicated stern/bow mounts for pulleys rather than using pad eyes; follow your kit's instructions carefully if this is the case.
- Install the Cleat: Choose a convenient spot for your cleat, typically mid-kayak, slightly forward of your seating position. This allows easy access for adjusting the trolley while fishing. Mark and drill the holes, applying sealant, then secure the cleat.
- Thread the Trolley Line: This is where it all comes together.
- Start by running one end of your trolley line through the trolley ring.
- Take one end of the line and thread it through the pulley at the bow.
- Bring that same end back along the side of the kayak and thread it through the pulley at the stern.
- Now, you have two ends of the trolley line hanging near the cleat. You'll use these to create the closed loop.
- Bring the two ends together and tie them with a strong knot, such as a double fisherman's knot or a triple surgeon's knot, creating a continuous loop that runs through both pulleys and the trolley ring. Make sure the loop is snug but not so tight that it creates excessive friction.
- Melt the ends of the rope with a lighter to prevent fraying.
Once installed, test the system. The trolley ring should slide smoothly from bow to stern with minimal effort. Your cleat should securely hold the trolley line in place. Take your time, double-check your work, and you'll have a robust system ready for action on your next Kansas Fishing Seasons Guide adventure.
Using Your Anchor Trolley Effectively for Kansas Fishing
Installing your anchor trolley is just the first step. The real magic happens when you learn to use it effectively on the water, transforming your kayak into a much more stable and fishable platform. Whether you're targeting big channel cats on a river or trying to hold over a structure for crappie on a lake, the anchor trolley gives you an edge.
Deploying and Adjusting Your Anchor Point
The beauty of the anchor trolley is how it simplifies anchor deployment and retrieval while offering unparalleled control.
- Deployment: To deploy your anchor, first attach your anchor line to the trolley ring. Ensure you have enough anchor rope paid out for the depth you're in, plus extra for 'scope' (typically a 3:1 or 5:1 ratio of rope length to depth for good holding power). Gently drop your anchor over the side, making sure your feet or fishing lines are clear.
- Adjusting the Anchor Point: Once the anchor is holding, grab the trolley line near your cleat. Simply pull the loop to slide the trolley ring and, consequently, your anchor's attachment point along the side of your kayak.
- To point your bow into the wind/current: Slide the trolley ring towards the stern of your kayak. Your kayak will naturally pivot to face the wind or current, offering a stable casting platform. This is incredibly useful on blustery days on Kansas lakes.
- To point your stern into the wind/current: Slide the trolley ring towards the bow. This might be useful if you're fishing a specific structure behind your kayak or want to retrieve your anchor more easily from that end.
- To hold a broadside drift (less common, but possible): While generally not recommended for stability, you could, theoretically, center your anchor point. However, for most Kansas fishing, you'll want to be bow or stern into the elements.
- Securing the Line: Once you've achieved your desired boat orientation, wrap the trolley line securely around your cleat to lock the trolley ring in place. You're now hands-free and perfectly positioned to fish.
Always remember the quick-release aspect. In an emergency, or if your anchor gets hopelessly snagged, you can swiftly unwrap the trolley line from the cleat and let the entire anchor system (anchor, rope, and trolley ring) go, freeing your kayak. You can retrieve it later, or worst case, you lose an anchor but keep your kayak and stay safe.
Advanced Techniques for Kansas Waters
Once you master the basics, you can start using your anchor trolley for more nuanced fishing strategies specific to Kansas.
- Precise Structure Fishing: Imagine you've located a submerged brush pile on your fish finder that's holding crappie or bass. Instead of just trying to drift over it, you can use your anchor trolley to position your kayak directly over the structure, or slightly upwind/upcurrent from it. This allows for repeated, accurate casts into the strike zone. You might anchor and then precisely adjust your position by a foot or two using the trolley to hit different angles on the structure. This kind of pinpoint accuracy is a game-changer for Kansas Crappie Fishing Techniques or Kansas Bass Fishing Guide efforts.
- River Current Management: When fishing Kansas rivers for Best Live Bait for Kansas Channel Catfish, the current is a constant factor. With an anchor trolley, you can anchor upstream and then adjust the trolley to hold your kayak perfectly in a current seam or along a bank. This allows you to present your bait naturally without constantly fighting the drift. If the current changes or you want to move to another spot just a few feet away, a minor adjustment to the trolley is often all that's needed, rather than pulling up and re-deploying your entire anchor.
- Windy Reservoir Tactics: Kansas reservoirs are notorious for wind. When that happens, fishing from a kayak can feel like wrestling an octopus. The anchor trolley is your secret weapon. If you're trying to fish a rocky point for walleye or a submerged hump, anchor upwind, then slide your trolley to the stern. Your kayak will naturally weather-vane, pointing your bow directly into the wind, providing a stable, straight platform for casting. This makes it much easier to feel subtle bites and maintain control of your lure. When the wind shifts, a simple adjustment of the trolley line is all it takes to re-orient.
Practicing these techniques will not only make you a more effective kayak angler but also enhance your enjoyment of the diverse fishing opportunities Kansas offers. Remember, always carry a Best Cooler Size for a Day of Fishing to keep your hard-earned catch fresh!
Maintaining Your Anchor Trolley and Troubleshooting Common Issues
Like any piece of fishing gear, your kayak anchor trolley setup will perform best and last longest with a little regular care. Neglecting it can lead to frustrating snags, breakdowns, or even dangerous situations on the water. A well-maintained trolley is a reliable trolley, and knowing how to troubleshoot minor issues can save your fishing trip.
Regular Care and Inspection for Longevity
Taking a few minutes after each trip or at the start of a new season to inspect your anchor trolley can prevent bigger problems down the line.
- Rope Inspection: The trolley line and your actual anchor rope are the most vulnerable components. Check for fraying, nicks, or excessive wear, especially where the rope passes through pulleys, cleats, or over the kayak's edges. If you see significant wear, it's time to replace the rope. Synthetic ropes, while durable, will degrade over time, especially with UV exposure. You can often find replacement rope at stores like Bass Pro Shops or on Amazon.
- Hardware Check: Inspect all pad eyes, pulleys, and the cleat. Are they securely fastened? Are any screws loose? If so, tighten them down, reapplying marine-grade sealant if necessary to maintain a watertight seal. Check the pulleys for smooth operation; if they're gritty or stiff, rinse them thoroughly with fresh water. If they remain stiff, they might need lubrication or replacement.
- Cleaning: After fishing, especially in muddy or silty waters, rinse the entire trolley system with fresh water to remove any dirt, sand, or salt residue (if you ever venture into brackish water). This prevents buildup that can cause friction and wear.
- Storage: When not in use, store your kayak and its trolley system out of direct sunlight to prolong the life of the ropes and plastic components. If you remove your anchor, ensure the trolley ring is secured to avoid it flapping around during transport.
By making these simple checks a habit, you'll ensure your anchor trolley is always ready for your next fishing adventure, whether you're heading to a Kansas Community Lake Fishing Rules spot or a large reservoir.
Common Troubleshooting and Safety Tips
Even with the best maintenance, things can occasionally go wrong. Here's how to deal with some common issues and reinforce safety practices:
- Trolley Line Snagging: If your trolley line seems to be snagging or not sliding smoothly, first check for any debris caught in the pulleys or under the line. Sometimes the line itself can twist. Ensure the rope isn't overly tight, which can create too much friction. If the problem persists, inspect the pad eyes for any sharp edges that might be catching the line.
- Anchor Getting Stuck: This is a classic frustration. If your anchor gets snagged on the bottom and you can't pull it free, do not pull against it with all your might. This could damage your kayak or even flip you. Instead, pull the anchor trolley system to the opposite end of your kayak. Then, pull the anchor line from the new angle. Often, approaching the snag from a different direction will dislodge it. If that doesn't work, and you have a quick-release system, it might be safer to deploy your quick release and retrieve your anchor later with a grapple hook, or consider it a lost cause for safety.
- Quick-Release Practice: It's absolutely crucial that you know how to operate your anchor trolley's quick-release. Practice this a few times in calm water before you need to use it in an emergency. Being able to instantly detach from a snagged anchor or rapidly free yourself from a dangerous situation can literally be a lifesaver. This is especially important for Fishing Without a License Penalties in Kansas, if a penalty is to be applied, ensuring you and your equipment are safe from further harm is priority number one.
- Anchor Line Management: Always manage your anchor line carefully. Coil it neatly when not in use to prevent tangles that can impede deployment or retrieval. Many anglers use an anchor cleat or a dedicated storage bag for their anchor line. Don't let excess line just float in the water where it can snag your prop, rudder, or worse, wrap around your leg.
- Consider a Second Anchor: For extreme conditions or specific tactics, some anglers carry a second, lighter anchor to use in conjunction with their main anchor or as a backup. This can offer even more precise boat positioning or serve as a drift sock alternative in strong winds.
Equipping your kayak with an anchor trolley and knowing how to use it safely and effectively will transform your Kansas fishing experience. You'll spend less time battling your boat and more time enjoying the tranquility and thrill of catching fish.
Disclaimer
This article is for general informational purposes only and does not constitute professional advice. Laws, prices and regulations vary by location and change over time. Consult a qualified professional for guidance on your specific situation.